Sunday 28 April 2013

Exercise - Shiny surfaces

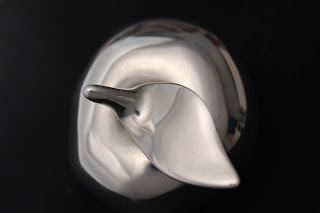
Initially I was going to photograph a chrome letter plate, as it was flat and very shiny.  However, I found the width rather awkward when it came to making the tracing paper cone.  I decided a smaller object would be better for this exercise.  Although not flat, this chrome paper weight in the shape of an apple seemed a good choice.  Also, its roughly round shape and varying curves represented more of a challenge than a totally flat surface.
The subject was placed on a black cotton sheet atop a small table with the camera, on a tripod, fixed above.


2013.04.27.ChromeApple (1)
f/14  1/80  ISO - 400
The tungsten light source, with no diffuser, was held close to the camera, above the subject.  The surface of the metal is unappealing and dull.  Also, the glare of the light reflected in the metal surface is unsatifactory, along with reflection of my hand.

2013.04.27.ChromeApple (2)
f/9  1/100  ISO-400
Using some tracing paper (A3) taped together, I made a cone of sorts and placed the wide end surrounding the subject, with the other end around the sides of the camera lens.  The light was moved to directly right of the subject.  The top areas look a lot more apealing, but the sides strucj directly by the light look dull and don't blend well.  There is less glare, and just a small reflection of the camera.
 
2013.04.27.ChromeApple (3)
f/9  1/160  ISO-400
The light was moved directly behind and to the right, the subject adjusted slightly.  The different angles of the surface's contours have reduced the reflection of the camera to a  very small dot.  The surface texture is improved, although the right and bottom sides of the subject are still not right.
 
2013.04.27.ChromeApple (4)
f/9  1/250  ISO-400
The light was moved directly behind.  This made the edges darker, blending more into the background.  However, the top surface areas are dulled.
 
2013.04.27.ChromeApple (5)
f/9  1/30  ISO-400
The light was raised much higher (1.5-2m), positioned slightly to the left and behind.  The different contours of the surface are shown quite well, although the midtones on parts of the left edge look a bit odd.  There is some reflection of the camera, my hand and a support beneath the "leaf".

2013.04.27.ChromeApple (6)
f/5.6 /1/25  ISO-400
An umbrella diffuser was attached to the light, which was kept at the same hight but moved more to the left.  The surface has less of a metallic look to it now.  

2013.04.27.ChromeApple (7)
f/5.6  1/80  ISO-400
The umbrella was removed and the light positioned directly above. Unwanted reflections now appear around the right side edges towards the top.

2013.04.27.ChromeApple (8)
f/5.6  1/400  ISO-400
 
I lowered the light to about 30cm above the camera, and to the left.  The image is quite pleasing, with good tonal variations, showing the shape, and with no reflections.

2013.04.27.ChromeApple (9)
f/8  1/400  ISO-400
The light was lowered further, to about 10cm above the camera and as close as possible.  The subject was rotated round slightly for a better composition and to remove the shadow beneath the leaf.  I'm happy with this as the final image.

What I can learn from this exercise is that the light source should be large than the subject, when it has a shiny surface.  The best results also come from the light facing the subject directly, although I think this mayalso work with a light source below a diffused background, such as milky perspex.


Saturday 27 April 2013

Exercise - Outdoors at Night

2013.03.21.CroydonSkyline(Dusk).jpg
f/10 1/15 ISO-6400
The above image was taken in fading light, before the sun had disappeared completely.  With the ISO at its highest setting, a very slow shutter speed was still required for a moderate depth of field.  There is some noise, although not of great concern.  The buildings in the foreground are brighter in large part due to the close artificial lighting in the high street.

2013.03.21.CroydonSkyline(Dark).jpg
f/6.3  1/50 ISO-6400
In this second image of the Croydon Skyline, from a different angle, there is very little light left.  A lower shutter speed would have allowed for a narrower apperture.  However, this would have required the use of a tripod, making the desired composition not possible.  The foreground is not as bright as the first image, and the roof top areas blend into each other as dark shapes.  There is visibly less light in the image, even with a low f-stop and shutter speed.

2013.03.21.TownHallUnderCover.jpg
f/10  1/10  ISO-6400
The town hall was covered in sheeting during building works.  The tungsten lighting on the building created a warm orange glow, creating texture and interesting shadows.  I took several different shots of the building.  I chose this one for the blog as I like the effect of the blurred bus, with the movement slightly at odds with the calm ahead of it.

2013.03.21.StarryLights.jpg
f/13  1/13  ISO-6400
Tungsten street lighting shot with a slow shutter speed seems to make a quite pleasing star effect.  The brightness of street lighting and lit buildings can create interesting patterns when shot from a distance.  The dark foreground draws the viewer in towards the lights in the background.  The blue neon lines and the starry steet lamps leap out from the dark.

2013.03.21.BlueNeonBuilding.jpg
f/14 1/6  ISO-6400
Closer in to the blue neon building, and from a side view, this is a very different image.  Closer to the light, it was much brighter, enabling me to increase the f-stop and take a picture at a very slow shutter speed without the use of a tripod.  The slow shutter speed blurred the passing car, creating lines of light from its headlights.

2013.03.21.Space&Light(1).jpg
f/14  1/6  ISO-6400
2013.03.21.Space&Light(2)
f/9  1/6  ISO-6400
The above two images were taken outside a new building still being worked on.  Brightly lit and vacant, there were interesting patterns of light, space and shadows.  Looking at the first image you would think it was taken in mono.  In fact there was just naturally no colour in the frame.  There is just a very slight tint of colour in the second photo.

2013.03.21.Queen'sGardens.jpg
f/5.6  1/15  ISO-6400
Shooting from and across a low lighting position, the trees are just discernable shapes and the lights in the background are blurred.  The level of the lighting here captures some of the mood of this town centre park at night time.

2013.03.21 .Subway.jpg
f/7.1  1/15  ISO-6400
In this shot leading towards the subway entrance, a clear difference can be seen between the outside tungsten lighting and the fluoresent light inside the tunnel.

2013.03.21.FarifieldHalls.jpg
f/14  1/13  ISO-6400
2013.03.21.FarifieldHalls(DriveBy).jpg
f/5.6  1/6  ISO-100
The two photos of The Fairfield Halls show how a quite plain and ugly building can be transformed when lit up at night.  The second image has a quite bright glare around the middle of the building. This shows how the angle of view and position of the floodlights should be considered, as with any other lighting.

2013.03.21.Underpass (1)
f/20  1/3  ISO-6400
2013.03.21.Underpass (2)
f/20  1/3  ISO-3200
The two pictures of the underpass were taken with a low shutter speed, creating interest effects from the cars' lights, and reflections on the shiny surfaces.

2013.03.21MossBros.jpg
f/20  1/15  ISO-3200
A shop window is brightly lit from the inside.  The areas around the window, on the outside of the building, remain in dark shadow.

2013.03.21.TronBuilding (1).jpg
f/5.6  1/30  ISO-3200
2013.03.21.TronBuilding (2).jpg
f/5.6  1/30  ISO-3200
2013.03.21.TronBuilding (3).jpg
f/5.6 1/30 ISO-3200
2013.03.21.TronBuilding (4).jpg
f/5.6 1/30 ISO-3200
What I have labelled as the Tron Building was my favourite subject for this exercise.  The unusual design of building has many different shapes and angles, with interesting variation of light.  The mixture of internal lights and coloured external lighting blend well with the variety of shadows and angles, making some pleasing patterns.

2013.03.21.SurreyStreet (1).jpg
f/4.5  1/30  ISO-3200
2013.03.21.SurreyStreet (2).jpg
f/4.5  1/30  ISO-3200
The large plate glass shop front in the above image is lit fluorescently from the rear of a fairly large room.  This creates quite a bright glare, although softened by the calmer lighting at the front of the store.

2013.03.21.SurreyStreet (3).jpg
f/4.5  1/30  ISO-3200


Exercise - Tungsten & Fluorescent Lighting

Tungsten Light
  
After looking out of the window for a minute, with daylight fading, the light in the room appeared yellow / orange.  Looking outside again, daylight appeared blue. 
Setting the ISO to 100 and the aperture to its fullest (3.5) I found the shutter speed could be reduced to 1/6.  Increasing the shutter speed further made the exposure quite dark.
I then increased the ISO to 200, adjusting the aperture and shutter speed slightly, to take the following three images with varying white balance settings, as indicated.

 
2013.03.29.TungstenLight (1)
f/4.5 1/5 ISO-200
White balance: Auto

With the white balance set to auto, the light inside the room appears a little yellow, and there is a blue tinge to the outside view through the window.

2013.03.29.TungstenLight (2)
f/4.5 1/5 ISO-200
White balance: Daylight

 Now changing the white balance to daylight, the room appears very yellow / orange, while outside is still a bit blue it is less obvious than in the previous image.

2013.03.29.TungstenLight (3)
f/4.5 1/5 ISO-200
White Balance: Tungsten
The last image, with white balance set to tungsten, shows a more neutral and even light in the room.  Outside appears quite blue again, in fact more so than in the first image.
  
Fluorescent Light
 

2013.03.29.Kitchen-FluorescentLight (1)
f/11  1/8  ISO-1600
White balance: Auto

2013.03.29.Kitchen-FluorescentLight (2)
f/11  1/8  ISO-1600
White balance: Fluorescent
 In the first image under fluorescent light there is a slight green tinge.  This is most noticeable in areas of neutral colour, such as the chopping board behind the kettle.  There is some improvement with the white balance set to fluorescent for the second image, although not entirely corrected.


2013.04.02.Office(fluorescent) (1)
f/14  1/30  ISO-800
White balance: Auto
2013.04.02.Office(fluorescent) (2)
f/14  1/30  ISO-800
White balance: Fluorescent
 I was told that the lights in the office where I work are supposed to replicate natural light, so thought it would be interesting to perform the exercise there.  Also, the neutral tones should show the difference in the colour of the light.  A messy office isn't the most appealing of subjects, so I chose to incude the lights themselves in the composition.
In the first image, with white balance set to auto, there is a very clear green tinge.  This is largely corrected in the second image with the white balance changed to fluorescent, although I would not say that all colours are totally true to reality.  One other thing I noticed while scanning the room throught the view finder was how uneven the lighting is in this room, despite a pretty even spread of very bright lights.  This was not so noticeable to the naked eye.


Exercise - Cloudy Weather & Rain

Part 1 - Comparing under cloud & in sunlight

2013.03.29.Church(CloudyPt.1-1)
f/22  1/60  ISO-200

2013.03.29.Church(CloudyPt.1-2)
f/11  1/50  ISO
The first image of the church was taken while the sun made a brief appearance into blue sky, behind the viewpoint.  There are large, fairly hard shadows in the foreground.  The stone of the church's exterior is warm and appears slightly yellow-orange in places.  The grass, where not in shadow, is a bright and vibrant green. 
The second image, with the sun now behind clouds, no longer has shadows in the foreground.  The clouds act like a giant diffuser in front of the sun, now a large light source.  A generally bluer appearance to the image makes it much cooler, the colours are darker and less saturated.
Although I inadvertently reduced the shutter speed slightly, clearly the f/stop had to be reduced considerably to achieve the same exposure level.  While the cloud cover provides a more even light, it also reduces the light level.  Obviously, I could have increased the ISO, but for the purpose of this exercise the f-stop was reduced, to demostrate the difference in light.

2013.03.29.StationRdWest(CloudyPt1-1)
f/16  1/50  ISO-200
2013.03.29.StationRdWest(CloudyPt1-2)
f/18  1/50  ISO-100
For the second pair of photos, I had to return on another day to take the sunny shot.  As with the photos of the church, there are some hard shadows when the sun is out and the image is brighter than the one taken under cloud, although the exposure is the same. 
 
Part 2 - Overcast
 
2013.03.10.Cloudy Weather-Pt.2 (1)
f/9  1/40  ISO-400

2013.03.10.Cloudy Weather-Pt.2 (2)
f/5.6  1/320  ISO-400

2013.03.10.Cloudy Weather-Pt.2 (3)
f/5.6  1/250  ISO-200
In these three images taken under an overcast sky, the colours appear quite true to reality, although the temperature is low.  The second image does capture the reddish-violet colour on the plant well though.  The final image of this set, shows a variety of surface, with the detailed and smooths areas of the pot, the rough stone work behind, and the flat surface of the large leaf.  With highlights darker than you would expect in bright sunlight, and shadows reduced, the images are low contrast.
 
Part 3 - Rain
 
2013.03.17.Rain (1)
f/14  1/50  ISO-400
This first image taken in rain shows how it can have interesting effects on glass.  The refelection is distorted in the top right corner of the frame, and the odd bit of blur is created from droplets on the window pane.  The haziness from the glass steaming up adds some atmosphere.
2013.03.17.Rain (2)
f/8  1/25  ISO-800
 The rain was really falling hard when I took the second image, creating a layer of water on this  table.  Raindrops were falling and cause mass ripples on the layer of water.  By using a slow shutter speed a quite abstract pattern was captured.
2013.03.17.Rain (3)
f/14  1/15  ISO-800
The plastic chair in the above photograph is given texture and pattern from light effects on its wet surface.  The reflection of the chair on the table is distorted.  The water running over the table's surface has changed it from a diffuse reflection to direct.  The angle of view and tilt in the table caused the reflection to refract and distort.

2013.03.17.Rain (4)
f/6.3  1/100  ISO-800
In this fourth rain image, light and shadow reflect on the wet surface of the table.  The light reflections distort into zig zags. 
 
I could have chosen from a number of other shots, and was surprised at how many opportunites the rain created.  Suddenly there was a lot more points of interest, just outside my back door, with surfaces and materials transformed by the wet and changes in light.


Exercise - Variety with a low sun

 
Frontal lighting 
2013.04.23.AlienHead-FrontLighting
f/5.6  1/50  ISO-100
I held the camera down low, reaching from one side, and using the display to compose the image.  This avoided shadow from myself or the camera crossing the subject or background.  There is strong reflection of light down the centre of the subject.


Side lighting
2013.04.20.AlienHead-SideLighting
f/5 1/100 ISO-100
With the sun to the left, the lit side of the subject provides a contrast to the dark side and background.
 

Back lighting
2013.04.06.AlienHead-BackLighting
f/5.6  1/1600  ISO-100
With the sun behind the subject it is mostly just a silhouette, which shows its shape well.  Increasing the distance from the subject, or darkening the exposure would reduce the detail further.  However, I found it quite appealing retaining a small amount of light and detail.
 
Edge lighting
 
2013.04.23.AlienHead-EdgeLighting
f/5.6  1/60  ISO-100
 The sun was just out of the frame, behind and to the right of the subject.  The silhouette of the tree behind provides a dark backgound where the edge lighting is visible.